Char's MS-06S Zaku II

January 2008
I won this Gunpla for 100 yen from a UFO catcher at a game center in Shimokitazawa in April of 2006. I was there with my good friends Brian and Galen to have an awesome dinner at a Korean BBQ restaurant there. After dinner we stopped by a game center and I tried my luck with this UFO catcher. My friend Brian told me that I'd never be able to win it, but I grabbed it on my first try! Ha ha! So there, Brian!

After marathoning several Keroro Gunsou episodes, my wife Mayu expressed interest in building her own Gunpla, and she wanted to build Char's Zaku. I showed her that I had an FG Char's Zaku I had won for only 100 yen, and she wanted to build it. Up until now, I've only built HG Gunpla, so this was my first time to build an FG. They are smaller and not as detailed, and they do not come apart for easy painting. Nevertheless, I wanted to tackle this with my new airbrush! Mayu did the assembly and hand-painting, and I did the airbrush work.
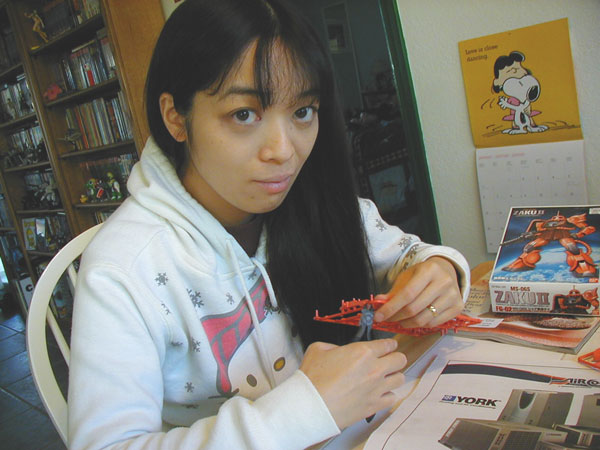
Mayu removed the pieces from the runners using a Tamiya cutter. I used my X-Acto knife to cut off the remaining parts of the gates to make it smooth. (She didn't feel comfortable using the knife herself.) Mayu assembled the pieces.
I didn't bother to prime the model first. We mixed some Tamiya acrylic paint to match Char's Zaku's main color. The runners were a bright orangish red, and we tried to make the paint a bit of a darker red color. It turns out that we inadvertently matched the paint to the plastic runners' original color very closely. We used red, a bit of white, and a dash of yellow to add the slightly orage color to it. Mayu watched me airbrush the model on our back patio. The torso color was airbrushed with Tamiya brown with a touch of red. I basically used some leftover brown/red paint I had already mixed and used for my Nautilus model I was building at the same time. I just added a bit more brown to make it darker.
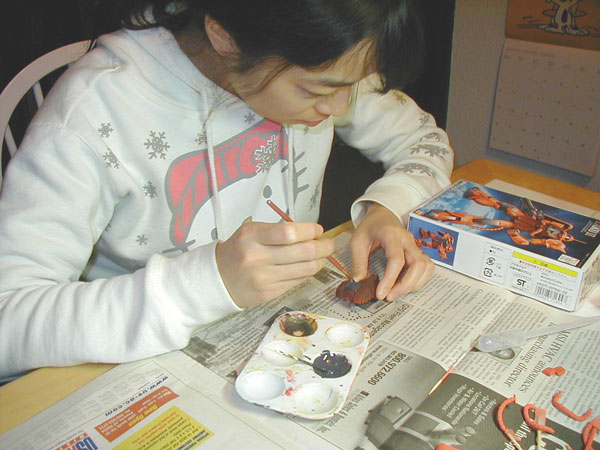
Mayu hand-painted the smaller parts. I taught her how to thin down the paint to make it easier to apply, and I taught her to apply in layers if necessary. The gun was painted with Testors acrylic Gun Metal and the chest, knees, etc. were painted Testors enamel Engine Gray.
When the paint was finished, I had Mayu do the panel lines with a finepoint GM01 Gundam Marker. Everything looked very nice for our combined efforts!
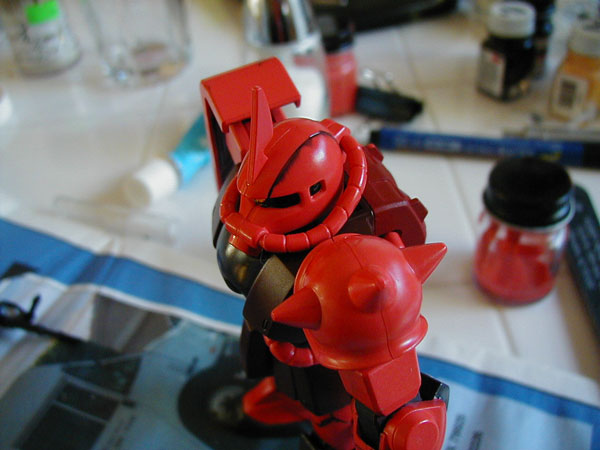
Then some drama began. When I did the gloss coat, some of the panel lines ran. I used a can of Testors Clear Cote to do a gloss finish on the model. It turns out that the alcohol from the Gundam Marker reacted to the lacquer-based Clear Cote and the markers ran. It's also possible that I applied too much Clear Cote. I learned from my mistake that panel lines should be done after the clear coat.
Then I had a good idea. Instead of repainting the figure where the panel lines goofed, I decided to use my new Gundam Weathering markers to cover up the areas where the panel lines ran. I chose "soot black." I also used it to cover up some areas on the jet pack because I apparently didn't allow enough days for the acrylic to set there, and the lacquer exposed some areas there. After bleeding the weathering marker and applying with a makeup applicator (my wife fortunately doesn't wear makeup so I had to go buy a package of them), it now looked like the Zaku has flown through some smoke or something in a few areas. While it looks nice, the weathering marker apparently won't stick to the gloss lacquer coat and easily came off onto my fingers. It was obvious that I needed to give it another finishing coat, so I used Testors Clear Cote again to finish the model.
January's issue of Dengeki Hobby Magazine came with a sheet of Gundam "marking seals." I was happy to see a big selection of such seals, so I decided to try one out. I decided to use a Zeon insignia to put onto the Zaku's shield. At first I was hoping that they were water decals, but after I cut one off of the page I was thinking that they worked like the "Gundam decals" that came with the HG Hyaku Shiki in which you apply the decal, rub it onto the model, then lift up on the sheet, leaving only the design. This is not the case. The film layer just stays there. These are just regular stickers and nothing else. I had to cut away the excess from the edge of the Zeon insignia to make it look nice. I don't know why Ban Dai thinks that their modellers are such amateurs. There are water decals available for Gundam kits, but you have to buy them seperately. I scraped some of the logo to give it a weathered look.
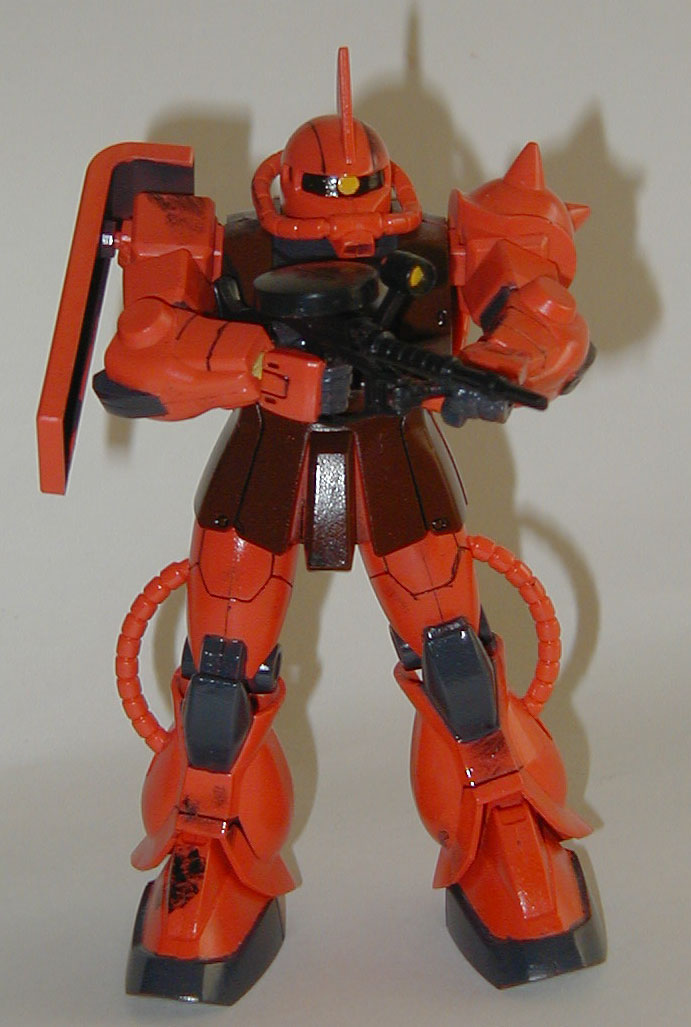
Below is the final result of my wife's very first Gunpla (with my assistance of course!).